
A Comprehensive Guide on Cropping in Adobe Illustrator CC | An Artist's Creative Process
Adobe Illustrator is a powerful tool for creating professional vector graphics. As an illustrator and designer myself, I have been working with the program on a daily basis for years. Tons of tutorials are offered as technical walk-throughs on how to crop images. But in this post, I will share my perspective as a practicing artist in hopes of optimizing your own creative workflow.
Note: Follow this link to download the latest copy of Adobe Illustrator CC
Use Cases for Illustrators and Designers
Use Case 1: To Reduce Visual Clutter
Say that you saw a perfect reference image for your next botanical drawing project. But you only need a part of the original photo other than the lush plant right in front of the door, which makes it a perfect use case to crop in illustrator. Cropping things off once you are set on visual can be a great thing to do to declutter your workspace, free up some storage, and cut the reaction time needed when you work in Adobe Illustrator.
Use Case 2: To Speed Up the Digitizing Process
Many of us start out drawing on paper before moving to the digital realm. The process of translating an analog drawing to digital format(s) is called digitalization. If you ever tried the live image trace function in Adobe Illustrator, you probably have heard your computer (hopefully metaphorically) panting for air as it renders. It uses a lot of CPU resources to determine how to best map out the anchor points to match your original drawing.
Any amount of elimination of unnecessary information can help to shorten the digitization process immensely. That's when the crop function comes in handy. So, try to get rid of all the information you don't need before tracing the image to optimize the image for vectorization. You will see the progress bar move much faster.
Use Case 3: To Reduce Illustrator File Size
If you have taken any number of my Skillshare classes, you know I am pretty big on adding textures to my artwork. And vector textures can go wild (and you should learn how to create textures), which just takes up a lot of space and make the file size huge when you have texture-heavy ai. file. It's like packing an international-travel-sized suitcase (50lb, for most airlines.) for a neighborhood ice cream trip. Not only it's unnecessary, but it can also get socially awkward. Well, you get the idea.
With that understanding of different use cases, now let's get it done in Adobe Illustrator
Cropping an Image or a Photograph
Unlike Adobe Photoshop, Adobe Illustrator is not traditionally known as a photo editing program, but it doesn't mean we can't perform simple tasks like cropping images inside the program easily. The ability to crop images without leaving the program is a much-needed productivity hack.
This method is for the most straightforward use of cropping: Put a rectangle on an image, boom!
Step 1: Download the image to your computer and drag it to your artboard. You could also drag the image directly to the Adobe Illustrator App icon on Mac if there is no active .ai file open.
The image is automatically selected upon import. And you will see a big X on the image selected. Fear not, it just means Illustrator has not embedded the original image yet. As far as the cropping tool goes, you can leave it as it is.
Step 2: While the image is still selected, click the Crop Image button on the control panel at the top

Click "Crop Image"
Step 3: Click OK if you see the pop-up window below

pop up window
pop up window
Step 4: Move and adjust the crop marks (aka the "cropping box") on the image similar to how you'd use the Rectangle Tool.
Note: Hold the Shift key to constrain the cropping box to a perfect square

drag the sides of the box to crop the image
Step 5: Press enter, or click the Apply button at the top when you are done. Tada! Now you have a cropped image to draw after to your heart's content.

Click Apply or enter to crop
Note: Remember to attribute credits to the photographer according to the rights assigned to the image.
Note for overachievers: Notice the button that says "Edit in Photoshop"? You can push the file directly to Adobe Photoshop from Illustrator. If you need a quick touch-up, level adjustment, contrast boost, etc., the file can be ping-ponged back and forth from there.
window.fd('form', {formId: '6241a89043a49fb25a549975',containerEl: '#fd-form-6241a89043a49fb25a549975'});
So, this is how you crop an image inside Adobe Illustrator. Let's look at some other use cases regarding vector graphics.
Cropping Vector Graphics Non-destructively/Temporarily
Use Cases for Cropping Illustrations Temporarily
A clipping mask is essentially hiding all the graphic information that falls outside of the mask. It does NOT delete all the extra pixels, unlike the Crop option in the Pathfinder Panel, which we will cover later in this post. This non-destructive method is great for hiding extra irrelevant details for the time being. See images below for example
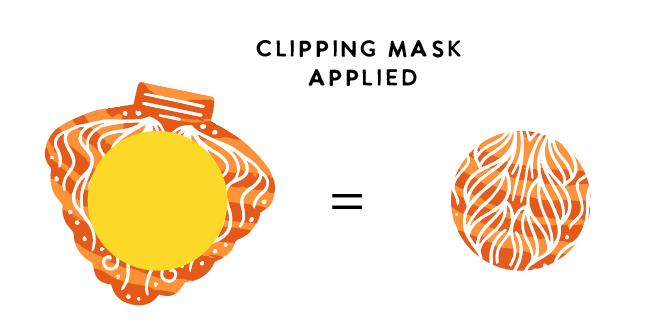
clipping mask applied
How to Crop a Vector Graphic (aka How to Use a Clipping Mask)
Step 1: Create a native shape in Illustrator.

Sample illustration by Esther Nariyoshi
Step 2: Place the shape on top of an existing image or illustration

Arrange the mask layer to be on top
Step 3: Select both the mask (yellow circle) and the illustration using the selection tool (V)
Step 4: Right-click > Make Clipping Mask. The keyboard shortcut is Command + 7 on Mac or Ctrl +7 on Windows.
Need a refresher on how to create basic shapes in Adobe Illustrator? I got you covered in this post!
Clipping Masks work for any irregular shapes and drawings
Rectangles and circles are the most commonly used shape to make a clipping mask, but any vector shape can function as a clipping mask. You can pick up the pen tool to create any custom shapes to serve as the clipping mask. The process is identical to the steps above.
Cropping Vector Graphics For Good
When Do You Need to Crop Permanently?
As we have covered at the beginning of the post, too many irrelevant anchor points can really slow down your workflow. It is completely ok if you want to experiment with different art directions at the beginning stage of your illustration process, but trimming off unrelated parts can help your file stay nice and fast. That being said, understand that this is the think-twice-crop-once sort of tool. Once your illustrator file is saved and closed, the cropped-off bits of illustration are gone forever.
How to Crop Off Parts of Illustrations Forever
Step 1: Follow all the steps in the previous section to make a clipping mask.
Step 2: Window > Pathfinder
Pathfinder Panel
Similar to the Shape Builder Tool, there are a variety of options for creating new shapes based on 2 or more overlapping shapes. If you need a comprehensive guide on how to navigate the Pathfinder panel, I have a post for you here. We will focus on the "Crop" option indicated below for our task
crop option
Step 3: Click "Crop". Viola! All the extra details are permanently trimmed off.

About the Author
Hi, I am an illustrator and digital brush creator who loves exploring all mediums. I've had the joy of collaborating with some wonderful folks, like Cloud9 Fabrics, and MSU Broad Art Museum, and sharing some tidbits of my creative process through UPPERCASE Magazine. My heart finds joy in food and nature illustrations, and I share my creative process on my YouTube Channel and teach well-designed illustration classes on Skillshare.
Portfolio | Instagram | Pinterest | Digital Brushes | 1:1 Coaching Calls

Skip hours of sifting through generalized tutorials, and enjoy a personalized learning session with a laser focus.


Premium Digital Brushes for Artists: Created by an Illustrator, for Illustrators. These expertly crafted digital brushes are designed to enhance your artistic workflow, offering precision, versatility, and exceptional quality tailored specifically for digital illustration.


Free Procreate Brushes Free Adobe Illustrator Brushes as well as other helpful resources to get you started in digital Illustration
Resources and Next Steps
I hope you now have a better understanding of how to crop images and drawings in an illustrator document. It is a function that is so helpful in graphic design and the illustration process. If you like the learning experience here, I have a couple of places to recommend for your next steps.
On-demand Skillshare Classes
I am an illustrator by trade, and I am kinda big on sharing/teaching. I teach 20+ classes on digital illustration with nearly 1 million watched minutes among 25,000+ students. I hope you give Skillshare a try, and here is the one-month-for-free link. If you like what you learned from this post, you will probably love following along with Make Geometric Shapes in Adobe Illustrator CC and Unflat: Make Vector Textures from Scratch in Illustrator CC Classes on Skillshare.


Unflat: Make Vector Textures from Scratch in Illustrator CC
Free Tutorials on Youtube
I also walk thru my digital illustration process on various quick projects. At the time of writing, 2 full seasons have been published to help anyone get started in Adobe Illustrator.
https://www.youtube.com/watch?v=D7A6Sqso8Nw
Get notified when future posts are available
Newsletter subscribers get dibs on pretty much everything: free seats for my Skillshare classes, new tutorials, updates, products, current projects, you name it.
Join my newsletter to keep in the know for future posts and news
Esther is a licensed Illustrator and designer, a Top Teacher on Skillshare.com where she shares her creative process using some of the most industry-leading programs like Adobe Illustrator and Procreate on iPad.
window.fd('form', {formId: '6241a89043a49fb25a549975',containerEl: '#fd-form-6241a89043a49fb25a549975'});