Essential Guide to Alpha Lock, Layer Masks, and Clipping Masks in Photoshop
Adobe Photoshop is an incredibly versatile tool used by photographers, graphic designers, and digital artists. It offers a wide range of features, among which Alpha Lock, Layer Masks, and Clipping Masks are particularly vital for creating sophisticated and professional-looking images. In this detailed guide, we'll explore these features, explain their differences, and provide helpful shortcuts to improve your Photoshop workflow. This guide is perfect for beginners and those looking to enhance their Photoshop skills.
Essential Guide to Alpha Lock, Layer Masks, and Clipping Masks in PhotoshopWhat is Alpha Lock?
Alpha Lock, also known as Transparency Lock, is a feature that lets you paint on a layer without affecting its transparent (alpha) areas. It's particularly useful for adding detail to an existing image without altering its basic shape.
How to Use Alpha Lock:
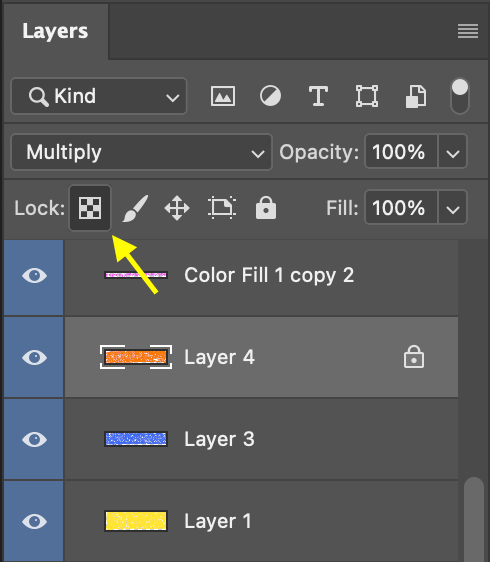
Location of the Alpha Lock in Adobe PhotoshopSelect the Layer: Click on the layer you want to edit in the Layers Panel.
Enable Alpha Lock: Click the ‘checkerboard’ icon at the top of the Layers panel. This action locks the transparent pixels of the layer.
Edit Your Layer: Now, when you paint or make changes, only the opaque (non-transparent) parts of the layer will be affected.
Shortcut for Alpha Lock: Press / (forward slash) with the layer selected.
You can also access Alpha Lock by Cmd + Clicking the layer thumbnail (then marching ants also appear on your layer)
Ideal Uses for Alpha Lock:
Adding textures or shading to icons or logos.
Coloring within a predefined area without affecting the transparent background.
Pros:
Simplicity: Alpha Lock is straightforward to use. It's great for quick edits where you want to paint or modify a layer without affecting its transparency.
Efficiency: It allows for fast coloring or texturing within the confines of existing shapes, which can speed up workflows, particularly in digital painting or design.
Cons:
Limited Flexibility: Once Alpha Lock is applied, it only allows editing on the non-transparent parts of the layer. This can be restrictive if you need to make changes outside the original shape.
Destructive Editing: Changes made with Alpha Lock are permanent to the layer, meaning you can't easily undo them without stepping back in history.
Understanding Layer Masks
Layer Masks are a non-destructive way of hiding or revealing parts of a layer. They offer great flexibility, allowing for intricate editing and compositing.
How to Use Layer Masks:
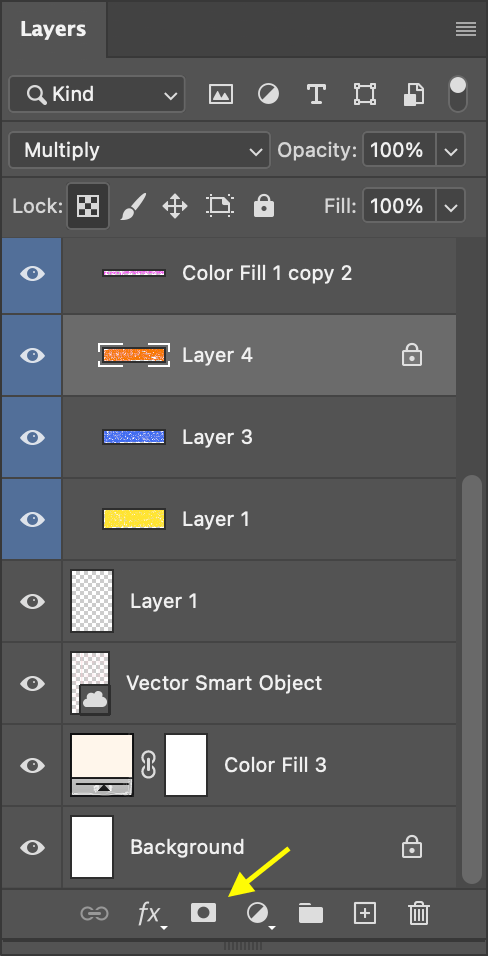
Location of the Layer Mask in Adobe PhotoshopSelect the Layer: Choose the layer you wish to mask.
Add a Layer Mask: Click the ‘Add Layer Mask’ icon (a rectangle with a circle inside) at the bottom of the Layers panel.
Paint on the Mask: Use black to hide, white to reveal, and grey for partial transparency.
The white rectangle will appear after clicking on the layer mask icon in Adobe Photoshop
Ideal Uses for Layer Masks:
Blending multiple images together.
Complex photo editing where you need to hide parts of an image without losing the data.
Pros:
Non-Destructive Editing: Layer masks allow for editing that doesn't permanently alter the original image. You can easily hide or reveal parts of the layer without losing any data.
High Flexibility: They offer precise control over the visibility of different parts of your layer, allowing for complex compositing and blending.
Cons:
Learning Curve: Layer masks can be a bit complex for beginners, requiring some time to fully grasp how to effectively use them.
Potential for Complexity: In projects with many layers and masks, managing and remembering the purpose of each mask can become challenging.
Mastering Clipping Masks
Clipping Masks allow one layer to define the visibility of another. They are crucial for texturing and detailed image composition.
How to Use Clipping Masks:
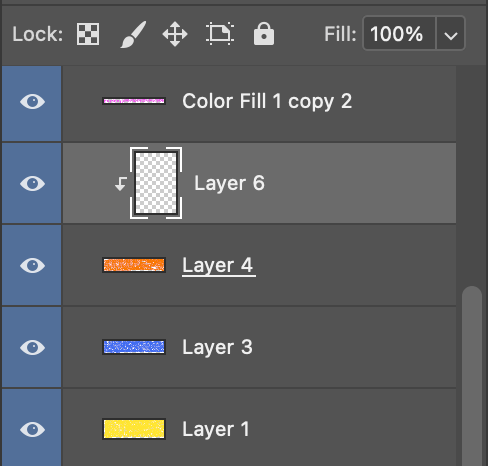
What the layer looks like with a clipping mask on
Arrange Your Layers: Place the layer you want to clip directly above the layer you want it to take the shape of.
Create the Clipping Mask: Right-click on the upper layer and select ‘Create Clipping Mask’.
Ideal Uses for Clipping Masks:
Applying textures or patterns to specific elements of a design.
Creating detailed photo effects where one layer needs to conform to the shape of another.
Pros:
Ease of Use: Clipping masks are simple to create and manage, making them user-friendly even for those new to Photoshop.
Versatility: They are extremely useful for applying textures, patterns, or adjustments to specific areas defined by another layer.
Cons:
Layer Dependency: Clipping masks rely on the layer below them. If the base layer is moved or edited significantly, it can affect the clipped layers in unexpected ways.
Limited to Layer Shapes: They are restricted to the shape and area of the base layer, which can sometimes be limiting if you need more flexibility.
When to Use Each Tool:
Alpha Lock: Ideal for quick edits where you want to restrict your changes to the visible parts of a layer.
Layer Masks: Best for complex edits where you need to dynamically show or hide different parts of a layer.
Clipping Masks: Useful for applying textures, colors, or effects to a specific area defined by another layer.
Conclusion
Alpha Lock, Layer Masks, and Clipping Masks are essential tools in Photoshop for anyone looking to enhance their image editing skills. Understanding these tools and incorporating the provided shortcuts can significantly streamline your workflow and unlock new creative possibilities. As you become more familiar with these features, you'll find they play a crucial role in most professional Photoshop projects. Practice using them to see how they can transform your work!
This post is a sister post of Alpha Lock, Clipping Mask, Layer Mask: in Procreate and Photoshop, which has a focus on Procreate
About Esther Nariyoshi
Hi, I am an illustrator and digital brush creator who loves exploring all mediums. I've had the joy of collaborating with some wonderful folks, like Cloud9 Fabrics, and MSU Broad Art Museum, and sharing some tidbits of my creative process through UPPERCASE Magazine. My heart finds joy in food and nature illustrations, and I share my creative process on my YouTube Channel and teach well-designed illustration classes on Skillshare.
Portfolio | Instagram | Pinterest | Digital Brushes | 1:1 Coaching Calls
Skip hours of sifting through generalized tutorials, and enjoy a personalized learning session with a laser focus. In a 1-on-1 session, you will receive personalized instruction on how to elevate your digital illustration to the next level based on your own artistic style and preference using Procreate, Adobe Illustrator, and Photoshop, as well as your paper sketchbook.


