Not all recoloring methods in Photoshop are created equal. Here are five techniques, from quick adjustment layers to manual brush work, and when each one makes sense.
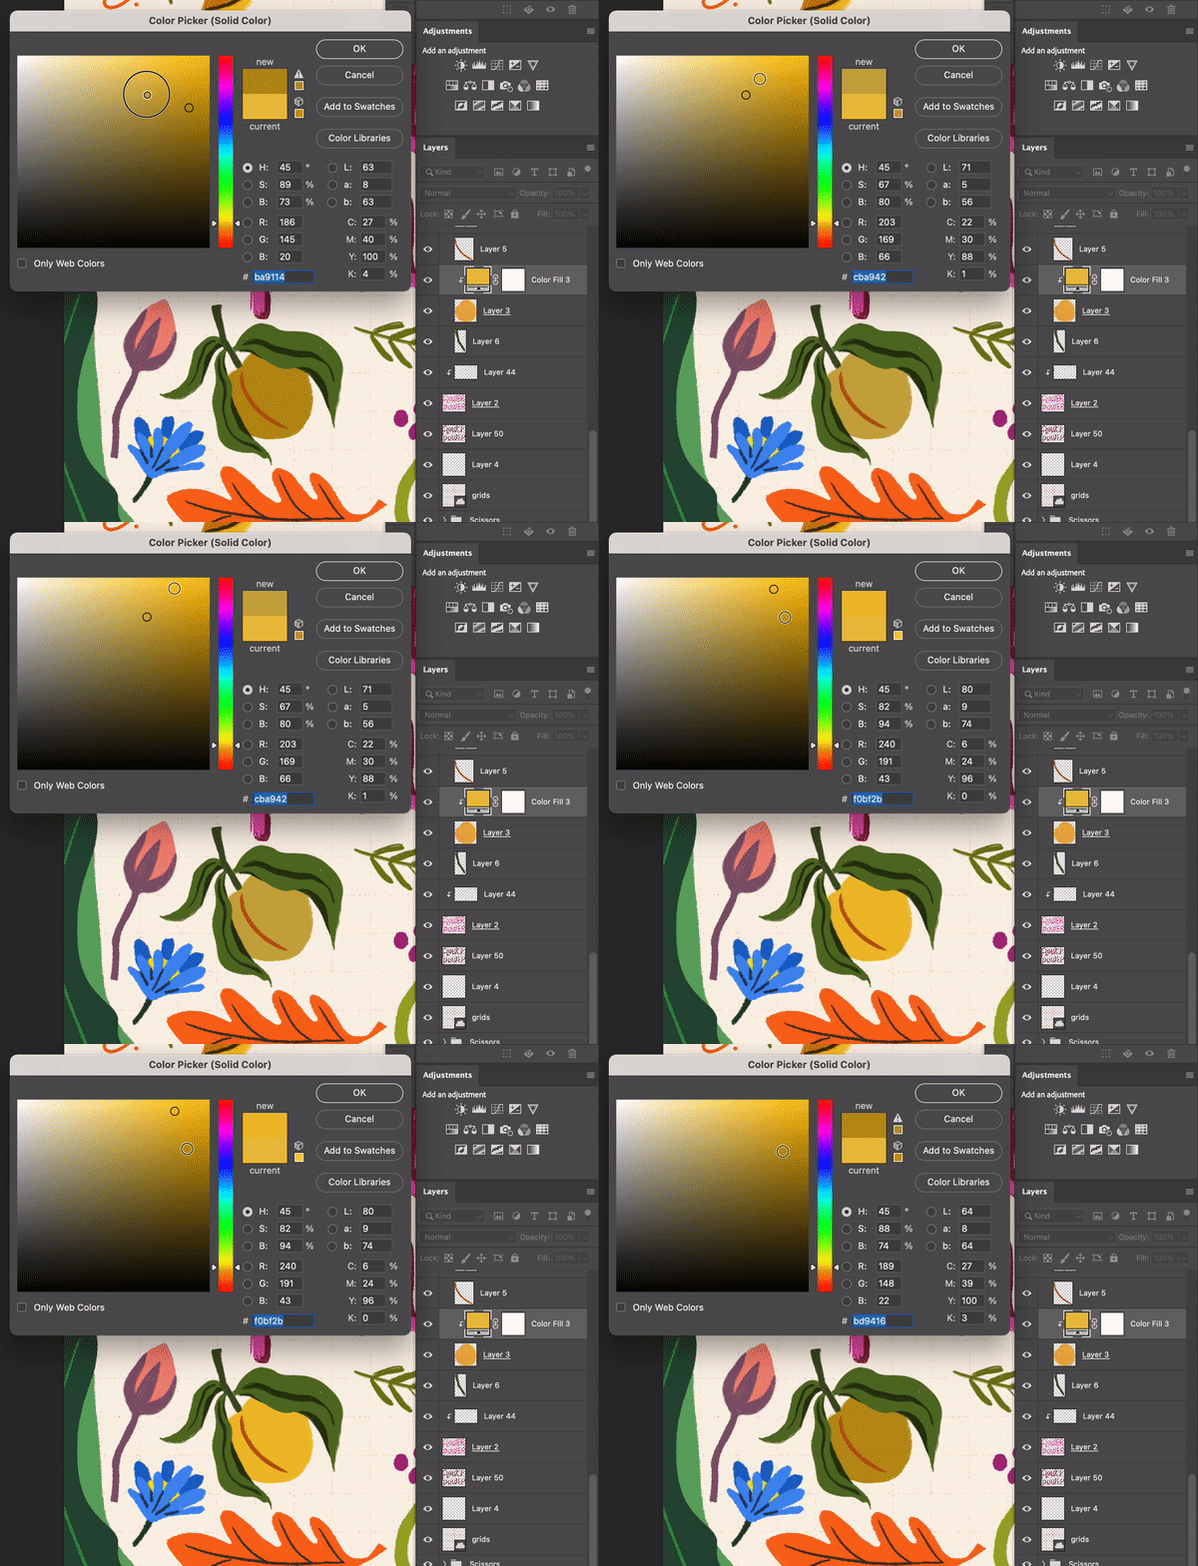
Section 1: Create a Solid Color Layer as a Clipping Mask

How to create a Solid Color Layer
This is one of my favorite ways to recolor in Adobe Photoshop. Because I use this method so much that I created my own Adobe Photoshop Action for it.

-
Step-by-Step Guide:
-
Select Layer > New Fill Layer > Solid Color -
Choose a color
-
Turn the solid color layer into a Clipping Mask
-

Create a Solid Color Layer as a Clipping Mask
Pros:
-
Non-Destructive Editing: Solid Color layers allow you to make changes without permanently altering the original image. You can adjust or remove the solid color without any loss of image quality.
-
Flexibility in Adjustments: You can easily change the color of a Solid Color layer at any time, making it highly flexible for experimenting with different color schemes.
-
Easy to Apply and Edit: Applying a Solid Color layer is straightforward, and editing it (like changing its blend mode or opacity) is simple, making it accessible even for Photoshop beginners.
Cons:
-
Limited to a Single Color: Unlike gradient or pattern layers, a Solid Color layer is restricted to one color, which can be limiting if your project requires a more complex color application.
-
Can Oversimplify Complex Tasks: For detailed color work, like photo retouching or color correction, a Solid Color layer may be too simplistic and might not offer the nuanced control needed.
-
Requires Understanding of Blend Modes: To fully utilize Solid Color layers, especially for more complex editing tasks, you need a good understanding of blend modes and how they interact with underlying layers.
Section 2: Using the Hue/Saturation Adjustment

The Effect of Hue adjustment Layer

Using the Hue/Saturation Adjustment
-
Step-by-Step Guide:
-
Open the image in Photoshop.
-
Go to 'Layer' > 'New Adjustment Layer' > 'Hue/Saturation'.
-
In the Hue/Saturation panel, use the hue slider to shift the image’s colors.
-
Adjust saturation and lightness sliders for finer control.
-
-
Practical Applications: Ideal for altering the overall mood or changing specific colors in a photo, like clothing or accessories.
-
Tips and Tricks: Utilize the 'Colorize' option to apply a single hue across the entire image for a monochromatic effect.
Pros:
-
Quick and easy to use, ideal for beginners.
-
Offers a broad range of color adjustments with simple sliders.
-
Non-destructive editing when used as an adjustment layer.
Cons:
-
Limited in targeting specific color areas; can affect the entire image if not masked properly.
-
Less precise control over individual color changes.
Section 3: Selective Color Adjustment Technique

Location of Selective Color in Adobe Photoshop
-
Detailed Instructions:
-
Open your image in Photoshop.
-
Select 'Layer' > 'New Adjustment Layer' > 'Selective Color'.
-
Choose the color range to adjust from the Colors dropdown menu.
-
Use the sliders to fine-tune the colors in the selected range.
-
-
Best Use Cases: Perfect for refining specific color ranges, such as enhancing greens in landscapes or adjusting skin tones.
-
Additional Tips: Experiment with adjustments in the neutrals for subtle tonal corrections.

Selective Color in Adobe Photoshop
Pros:
-
More control over specific color ranges compared to Hue/Saturation.
-
Able to adjust secondary colors (like yellows in greens).
-
Useful for fine-tuning colors without affecting the overall balance
Cons:
-
More complex than basic adjustments, requiring a better understanding of color relationships.
-
Adjustments can sometimes create unnatural color shifts if not done carefully.
Section 4: The Color Replacement Tool

Location of Replace Color Option in Adobe Photoshop
-
How to Use:
-
Select the Color Replacement Tool from the toolbar.
-
In the options bar, set the brush size and hardness.
-
Choose the sampling method (Continuous, Once, or Background Swatch).
-
Adjust tolerance to control the range of colors affected.
-
Paint over the area you wish to recolor.
-
-
Effective Usage: Great for tasks like changing the color of flowers or clothing patterns where precise control is needed.
-
Expert Advice: Layer masks can be used in conjunction with this tool for non-destructive editing and better precision.
Pros:
-
Allows for precise recoloring of specific areas without affecting surrounding colors.
-
Good for quick touch-ups and changes to small elements.
-
User-friendly with an intuitive brush interface.
Cons:
-
Not ideal for large-scale or complex color changes.
-
Can be time-consuming for detailed or intricate areas.
-
Sometimes struggles with color accuracy in areas with gradients or shadows.
Section 5: Brush Tool for Manual Recoloring
-
Tutorial on Usage:
-
Create a new layer and set its blend mode to 'Color'.
-
Select the Brush Tool and choose a foreground color.
-
Adjust the brush size, opacity, and flow for the desired effect.
-
Carefully paint over the areas you want to recolor.
-
-
When to Use This Method: Ideal for detailed work like eye color changes or adding color highlights to specific areas.
-
Professional Tips: Use a tablet for more precise control, and regularly pick colors from the image for a more natural look.
Pros:
-
Provides the most precise control for detailed recoloring.
-
Ideal for targeted adjustments like eye color changes or adding highlights.
-
Flexibility in brush size, opacity, and flow for nuanced editing.
Cons:
-
Time-consuming, especially for larger areas or complex images.
-
Requires a steady hand and skill, potentially challenging for beginners.
